
TR6 History and Restoration Notes
March 28, 2026
The TR6 dossier points to a car built on 10 June 1976, originally finished in Java Green and identified as chassis CF56708UO. Its story connects the UK, South Carolina, Connecticut and eventually Valencia.
It also describes a restoration process, including Full Body Off work, known weak-point repairs and a disciplined workshop approach. Types of material used, experiences and handy hints.
TRIUMPH TR6 CF56708UO
BUILD DATE: 10TH JUNE 1976
ORIGINAL COLOR: JAVA GREEN
THE CAR HISTORY:
The history behind the car, information gathered from previous owners and a resume of the restoration, I hope you will enjoy the story as I had many fun hours and some not so fun hours doing the strip down and rebuild, on the whole a very satisfying and gratifying experience. The first owner of this TR6 is unknown as yet, the second person to buy was Colonel Jack Thomas, who purchased the car in 1980 while he was serving in the US Air Force stationed in RAF Upper Heyford in Oxfordshire. The car lived in South Carolina in the early 80’s and was
eventually sold on to his brother Dr Robert Kane in 1993.
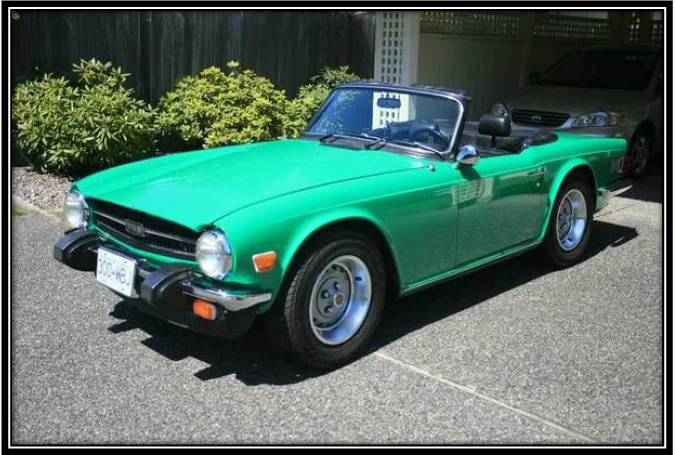
F1:NOTE: PHOTO ONLY REPRESENTATIVE OF COLOUR NOT ORIGINAL CAR
Dan Kane son of Robert Kane has many fond memories of the 740mile drive north up the east coast from Myrtle Beach, South Carolina to Brookfield Connecticut where the car was to stay until 2019. In 2012 the car was passed on from father to son for the princely sum of $1, the car had been cared for and had some work carried out in 2014 and having an extensive valuation carried out in 10/11/2017 (Evaluation available on request). During this time the car was repainted SILVER (F2) Dan sold the car in 2019 to ……….someone who was going to restore the car, this did not happen, although there were signs of someone starting with the restoration,
new flexible brake hoses and steering joints where fitted, rear brake shoes and cylinders and a clutch. I purchased the car in 2021 from an American Muscle Car dealer in the UK. Where and what happened to the car from 2019 to 2021 is somewhat of a mystery as yet. According to Steve R Smith (American Muscle Car Dealer) the guy I brought the TR from, told me that his agent in the US that finds the Muscle cars for him had seen this car in a lot, saw that it was complete and it just fitted into the next container bound for Europe, where an American car
would not have, the car came back over the pond, to where she was born.
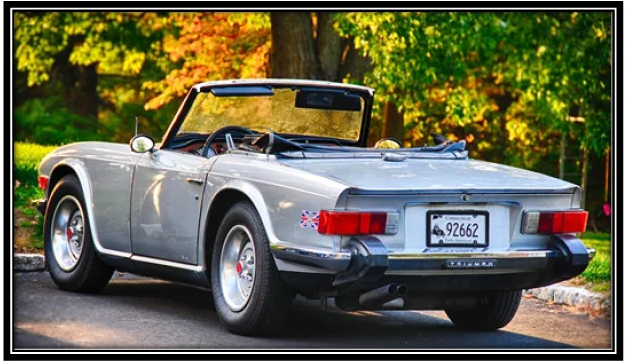
F2:NOTE: PHOTO OF CF 56708 UO IN Connecticut USA (2017)
The mileage shown on the evaluation report in 2017 is of 77.486, the current mileage (when arriving in Spain) is 77.533, its probably safe to say, as Dan did not use the car very much, that these are the original miles of the car.
MY HISTORY:
How did I come to buy the car, well a bit of a story to tell here, for many years I have been a “Petrol Head” (mad about cars) ever since I went shopping with my mother and she brought me my first dinky car when I was 4 years old. I have always been involved with machinery and motor vehicles and always had a passion for driving and fixing anything. My father was a very hands on man and taught me a lot of things from an early age. So much so that rather than pursue a career in languages and foreign affairs, I became a Motor Technician and did my HNC
at Colchester Polytechnic, eventually ending up as a Launch Engineer for FORD MOTOR COMPANY, hence the fact that I now live in Spain, after having launched the KA and FOCUS here in FORD Valencia, amongst other models in Europe.
Going back to why a TR6, during my time as an apprentice on a large family estate (Lord Rayleigh’s LTD.) workshop in ESSEX, where we repaired and maintained machines from a small lawn mowers or static Lister engines to cars and vans, 4×4’s, 40 ton lorries and all types of farm machinery & equipment. I must admit a very varied and enjoyable apprenticeship. As most mechanics of the time, to earn a few extra bob/pounds we would “moonlight” (work outside normal hours for cash). I was asked to change a clutch on a TR6, which I did, working in a barn with block and tackle, I never did get paid but the test drive was enough, I said to myself “One day I will have one of these” ,it has taken 45 years but here I am.
THE FIND:
My search for a TR started way back in 2018, (spurred on by my current wife) after many many websites, most of them where either too expensive or not worth repairing. I had almost given up, when one day I get a pop up from eBay about a car in Wales, recently imported from the US.
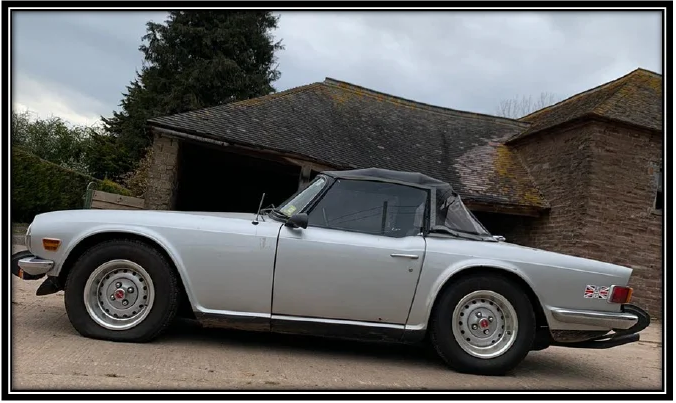
F3:NOTE: PHOTO OF CF 56708 UO IN OLD HEATH FARM ENGLAND “BACK TO HER ROOTS”
THE BUY:
The car looked complete, and above all a reasonable price, the car showed the usual points that these TR6’s tend to have, rear valance when meeting rear wings, lower door skins, rear tailgate, to name but a few. Most importantly the car was a stone’s throw away from where my longtime friend (we both studied together at the polytechnic) and fellow petrol head Nick Cant lived. Steve the guy who imported the car was willing to take the car to Nicks on a trailer, so that Nick could inspect and report back. Once Nick had inspected the car, with a long list in hand he gave me a call, “it’s not bad, you will have your work cut out but make him an offer” I asked Nick to pass me over with Steve. “Morning Steve I will give you so much, and you can drop it off the trailer” Steve hum and haw for a bit and eventually said OK “ Done deal” Now the project had began and now, where do I start? The first thing I did was to join the UK TR Register (one of the best investments I have made). Derek Graham who is the TR6 Registrar has been a great help throughout, with advice, things to do, people to talk to, suppliers and above all, he has always been available for any type of question, however big or small. Many thanks Derek.
Before I could bring the car over from the UK to Spain, the car needed to be registered in the UK. The car had been imported and duty paid (NOVA CERTIFICATE) into the UK. Graham Andrews, also from the UK TR Register, helped with getting the car registered, as he knows his way around the DVLA and has a vast knowledge of classical car registration procedures.
“Heritage Certificate” being a must, I love how we British maintain our Heritage, Culture and History. Bearing in mind that we were immersed in the COVID pandemic, making it very difficult to get anything done, especially that COVID practically decimated the DVLA center in the UK for months on end.
Eventually my longtime friend Nick, with the help of the UK TR Register, got the vehicle registered, V5c form in his name and he was able to permanently export the vehicle here to Spain. Before that happened Nick was able to double the value of the car, according to him, by putting 10 pounds worth of fuel in the tank!!! With this extra fuel he was able to take the TR6 up Shelsley Walsh Hill Climb, (Video available on request) a claim to fame that not many TR6 can say, far from the current 22,37 second record, Nick was able to report back on how she
performed and handled. He then referred to my TR6 as a “Triumph Herald on steroids”!!
THE JOURNEY:
I got in touch with Car Shipping 2 Spain, who brought the car over to me here in Valencia on the 7th September 2021 . I would recommend Car Shipping 2 Spain, the pick up at Nick’s place was not the easiest and the car arrived on time and in the same condition as it left the UK. Thanks to Julie White & John.
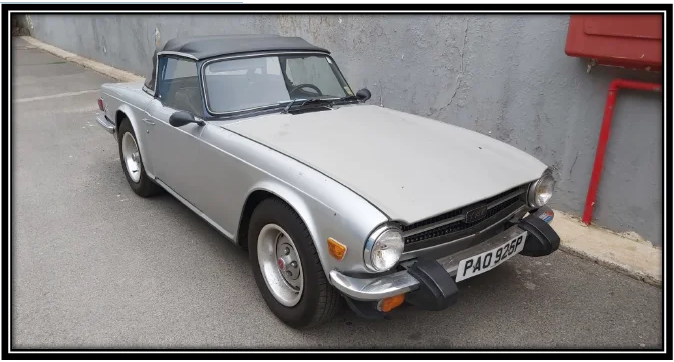
F4:NOTE: PHOTO OF PAO 925P PATERNA, VALENCIA, SPAIN 07/09/2021
How did I manage to find out the history behind the car? In the glove box there was an old US Title with a name and address.
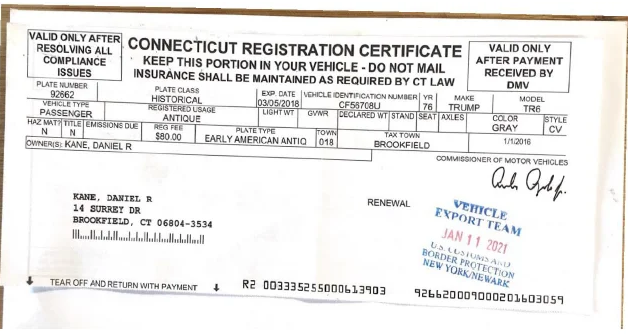
F5:NOTE: US TITLE
So what I did was to write an old style letter, with my contact details requesting any further information regarding the, “history of the car, how long you had the car, from whom you brought the car, previous owners, any service history, photographs etc etc.” “Any information you can give me will be very welcome.”
Popped the letter in an envelope and posted it to the US. About 3 months later the letter was sent back to me, with a label “RETURN TO SENDER ADDRESS UNKNOWN” as the Elvis Presley song. A few days later I was talking to my American friend Robert, who has a brother in the US, I mentioned the story and he said he would talk to his brother and see if he could find out where Daniel R Kane lived. A few days went by and he sent me the correct address, he was in the same town but had moved to a new house. New envelope, change of address and off to the post office again, 10 days later I get an email from Daniel, he was very pleased that I had
found the car, Dan and myself still keep in touch, and I have kept him up to date with various stages of the project.
THE PLACE:
Felix Leon, another dear friend and classic car fan, gave me the opportunity to do the restoration in his workshop. He gave me the use of a 2 post lift and space for all that was needed for the restoration. I would not have contemplated this project if it was not for the facilities that I had available. Many thanks Felix.
Now the work began, as the car was fairly complete and in reasonable condition, I decided to do a complete and proper job on the car.
The usual trouble spots found on TR6’s had to be done, both rear out riggers where the suspension “A” arms are fixed. Upper breast plate on the chassis, differential fixing brackets on chassis, lower seat belt fixings “B” Pillar, drivers side foot well, rear valance to rear wing & and minor corrosion points around the body. So, I decided to separate the body from the chassis, so that these repairs could be carried out correctly.
THE TOOLS:
One of my first purchases was a “Roll over Jig” (Colin from CASTWORX) with wheels, a tool that is essential for facilitating easy access to the body, easy movements around the workshop and being able to work comfortably on the body. It also helps to hold the body in place while you wheel out the chassis. Before you separate the body from the chassis it is highly recommended to “Brace” the body with a frame. This frame should be fixed across the body from the “A”
Pillar to “B” Pillar to avoid the body from twisting. I also made up a frame/trolley on wheels to be able to transport the body with ease for painting and body coating purposes. It also made taking the body off the Roll Over Jig a lot easier.
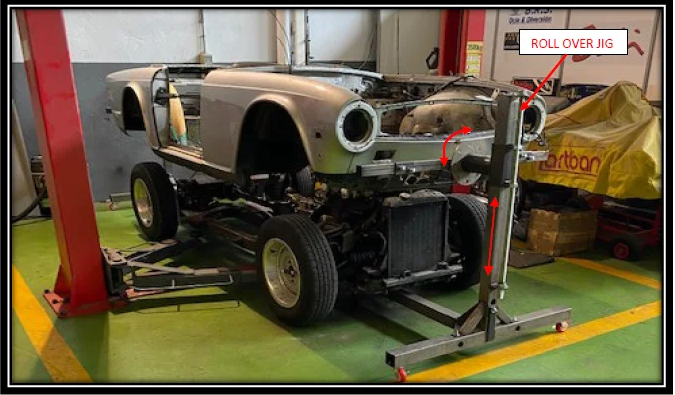
F6:NOTE: BODY SEPERATION USING “ROLL OVER JIG”
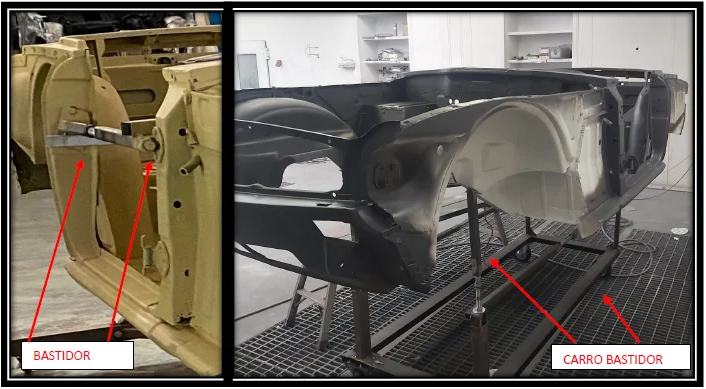
F7:NOTE: BODY BRACE FRAME F8:NOTE: BODY FRAME/TROLLEY
The next indispensable tool for any restoration was a small Sand Blaster Unit. Once you have stripped down, labeled and tagged/identified all your parts, take lots of photographs and videos, Now you can start to clean, prime and paint the parts to be restored. A word of warning, be careful on your choice of sand depending on what you are going to clean, if you are cleaning alloy parts use very fine sand, for steel and cast parts depending on their condition, use courser sand, but try on a small area first to ensure there is no damage done to the surface of the part you are going to clean. You will have a lots of parts to clean, be patient. I must admit, I totally underestimated the time it would take to clean all the parts.. A LOT OF TIME!!
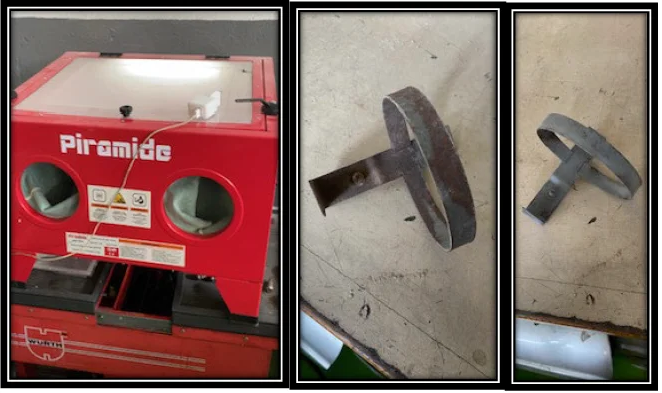
F9:NOTE: SAND BLASTER CABIN F10:NOTE: EXPANSION BOTTLE BRACKET (BEFORE) F11:NOTE: AFTER
Another indispensable tool is a UNF TAP & DIE SET. (Thanks Nick) A lot of the threads no matter how much penetration oil, “rust off” or wire brush you use, all threads will need to be cleaned, with a die or tap.
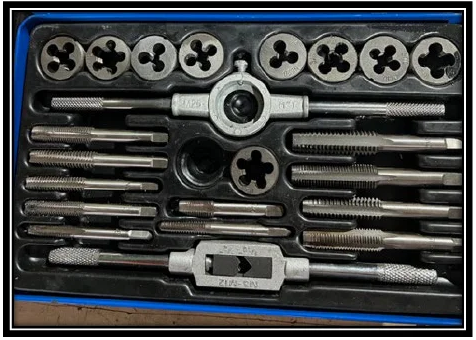
F12:NOTE: TAP & DIE SET
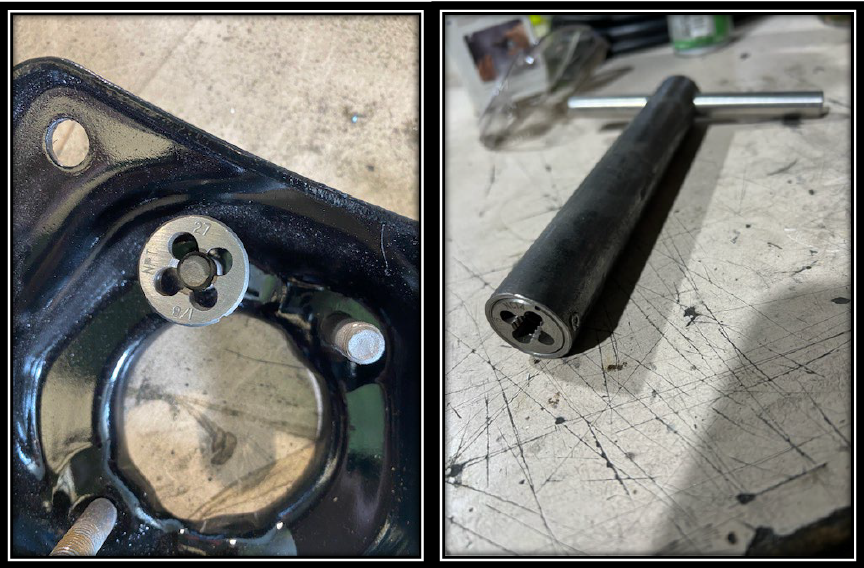
F13:NOTE: LOWER WISH BONE COIL SPRING CUP F14:NOTE: TAP TUBE TOOL
These nuts are especially exposed to the elements and will be very difficult to loosen without stripping the thread or even worse breaking the stud, don’t be in a hurry, let whatever product you use, I would recommend “RUST OFF by Würth, soak in for days, with various doses, in my case I had to heat some of the nuts to get them off. I had to make a tool up to be able to runup/clean the threads, because the normal wing spanner that comes with the Tap Die set, won’t allow you to get to the end of the thread, hence the tube tool (very simple to make). A/F Set of Spanners and Sockets, all Triumph cars have imperial fasteners. Many of these cars have been messed about with and you will find that there will be nuts and bolts of all sorts, Metric especially and not necessarily the correct length or size. So you will
need a set of Metric Spanners & Socket Set also. Welder: I chose the Welbach Tron 200 Welder, it’s a good all round welder and reasonably priced. Reason for buying the welder, after I was well and truly taken for a ride by a supposed professional bodyworker, and after having spoken to my friend Nick about the incident/saga,
he spurred me on to do it myself, so I finished a lot of the welding work myself, with lots of practice on odd bits of sheet metal and patience, I got the job done.
PROJECT PLANNING
Now, the process, organization & planning is very important. Don`t look at the big picture, you will get frustrated, you will waste time going from one task to
another, you will then get more frustrated, when you are frustrated and nervous your efficiency and effectiveness gets worse, you will begin to do things wrong, you will hurry things, get bogged down and eventually you may get to the stage of “what the hell have I got myself into” and have doubts about finishing the job. Time to walk away, leave it for a while, weeks maybe. When you are away use the time, you would have spent on the car to think it through, take a piece or part of the vehicle at a time, plan your work and stick to it. Split the workload into sections and box accordingly, thinking ahead for when you have to build up, example, front suspension, sand blast and clean all steel parts, prime and add topcoat. List all front suspension parts needed, in my case it was renew “everything”, all bushes with polyurethane ones, front shock absorbers, rubber boots on trunnions etc. etc. Place your order for just the parts you need, if you order other parts you may not need at this moment in time, you will have to set them aside, deal with them at a later date, need more space and control over them. Don’t worry it’s not a race, I have had good days and bad, mostly the good days have been when I have set out one task to do, made sure I had the tools, parts
and everything necessary to finish, those times the job went very well and surprisingly quick. These may seem like obvious things to do, but they help very much to a successful re-build. During the strip down, take as many photographs as necessary also videos, these will come in useful when eventually the job goes back together, when you get to my age, as much help as you can get with remembering where and how everything went will be much appreciated. Another great help has been Elin Yakov, his videos on YOUTUBE are very useful and you can learn some handy tips and hints when doing a restoration of this type. Also the members of the Spain TR Register (WhatsApp Group) were also a great help, there are some very knowledgeable members in the club.
“Stay focused and don’t get distracted from the task in hand”
“Also, don’t throw anything away, just yet”
THE MATERIALS
There are so many materials to choose from, I based my choices on other peoples
recommendations, internet forums and my own experience, (running an After Sales Technical Service for Industrial Vehicles for the last 20 years has helped) There has also been a real evolution of materials and process over the years. Especially with adhesives more on that later.
THE CHASSIS
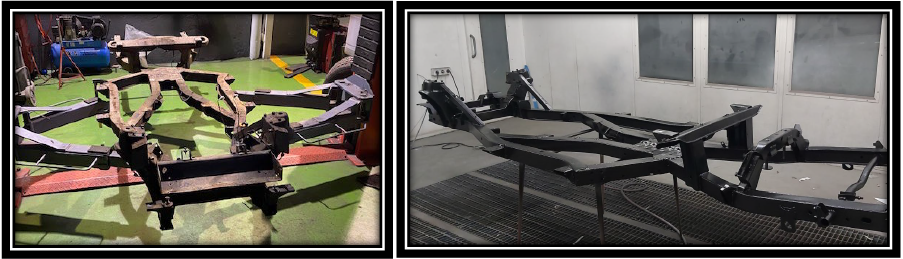
F15:NOTE: CHASSIS BEFORE F16:NOTE: CHASSIS AFTER
The first large item that I had bead blasted (Thanks to DECAMER) was the chassis. Important note: When I picked up the chassis from DECAMER and got it back to the workshop I noticed lots of beads left over from the blasting on the back of the trailer. The chassis was virtually full of beads, very important to get these removed from the inside of the chassis because when you spray the chassis beads will jump out into the paint a mess everything up. Important you must paint the chassis with primer quickly, especially in humid climates because surface rust & corrosion will start to form in a few days. So, using an air gun to remove most of the beads
from within the chassis was not enough, I had to turn the chassis on end various times to ensure that all the beads had been removed (be careful when handling the chassis you will need help, (thanks Sergio) having turned the chassis on its end various times I poured in RUST CONVERTER, this makes an awful mess on the floor, so make sure you put down lots of rags and newspaper. Leave it to soak in for a few days, the rust converter will kill/stop any rust getting worst inside the chassis itself. After that I treated the chassis with a type of waxoyl (comercial name) I used the equivalent from WÜRTH, the aerosols come with a long plastic tube with circular spray nozzle to ensure it gets in all the corners and all internal parts of the
chassis.
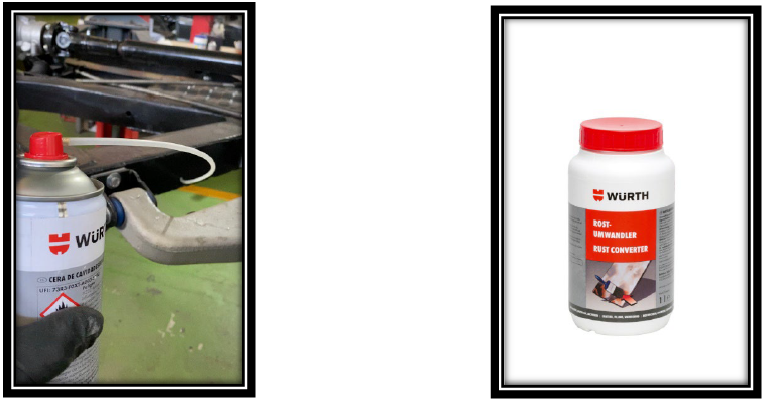
F17:NOTE: SPRAYING WAX INTO CHASSIS F18:NOTE: RUST CONVERTER
I would say all un restored TR6,s have corroded rear “A” arm supports, both mine were, you will need to make up a Jig (thanks Toni) to make sure the “A” Arm fixing holes are in exactly the same position when you weld the new plate in. If these holes are not perfectly aligned, you will have the wrong rear wheel geometry leading to premature wear on the tyres and poor handling.
This ELIN video explains it very well https://www.youtube.com/watch?v=f9qJ4v6JPnw
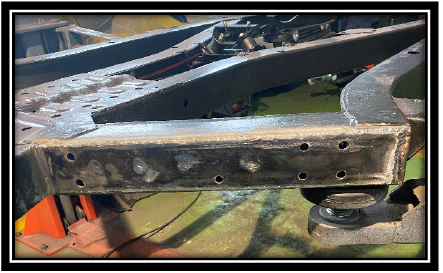
F19:NOTE: REPAIRED OUT RIGGER
Other parts of the car that I took to DECAMER where the following;
5 x Road Wheels, Brake Drums. Exhaust Manifold, Inlet Manifold, Complete Exhaust Pipe, All other steel and alloy parts I cleaned in my sand blaster cabin.
Treatment after blasting, I used the following;
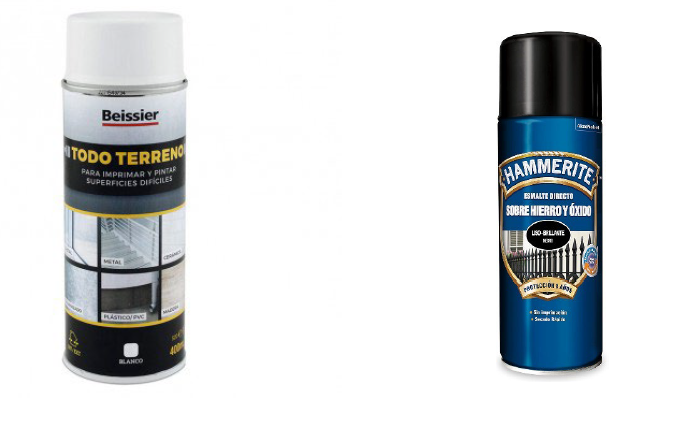
F20:NOTE: PRIMER USED F21:NOTE: TOP COAT USED
THE BODY
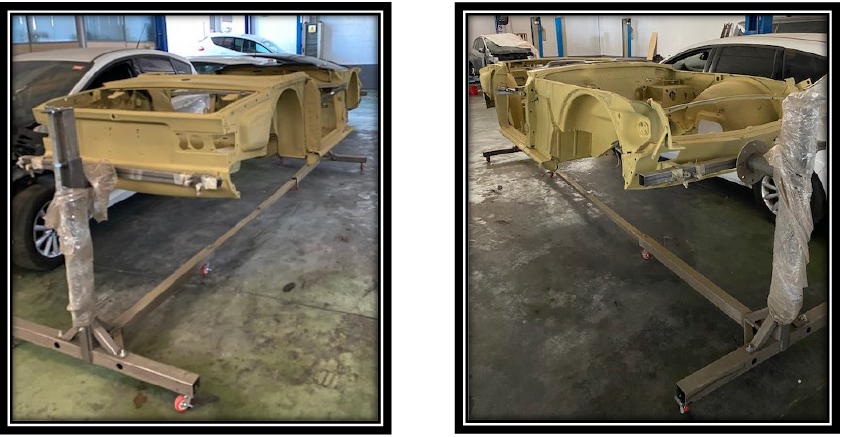
F22:NOTE: BLASTED & PRIMED BODY (REAR VIEW) F23:NOTE: BLASTED & PRIMED BODY (FRONT VIEW)
Important note, after blasting the body it must be painted very soon before surface rust & corrosion starts. By having the complete body blasted it is very easy to see the parts that will need repairing.
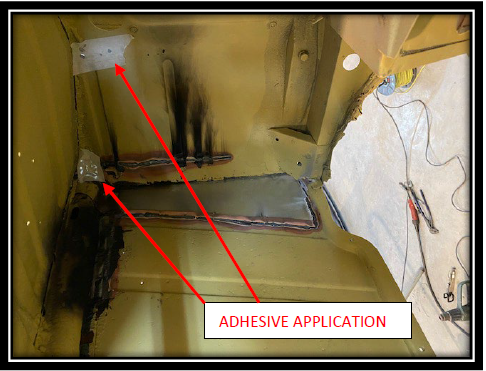
F24:NOTE: REPAIRED FLOOR PAN & EXAMPLE OF ADHESIVE USE
As the sheet metal on the triumph body is very thin, care must be taken when welding, try and use the lowest setting to avoid blowing through the material. As for very small holes I have used structural adhesives, they are very easy to use, hardwearing, flexible, adaptable to temperature change and will not crack. Buy placing some masking tape on one side of the metal to repair and apply the adhesive from the other side, smoothing out with a spatula and once dry (it goes off very quickly) you can sand down with some wet & dry abrasive paper, it is now ready for the primer. I found this method very easy and quick to do especially for all those small areas that would be very difficult to weld.
There are many to choose from and they vary a lot in price, this is the adhesives (Tin Solder Replacement) I used, its expensive, but very good.
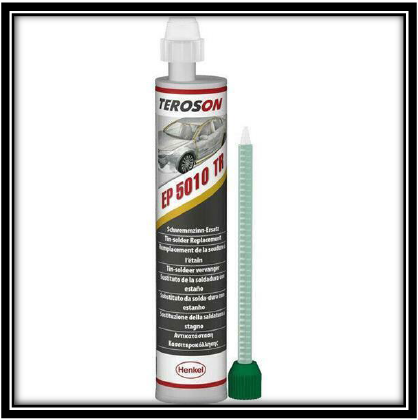
F25:NOTE: EXAMPLE OF ADHESIVE (TIN SOLDER REPLACEMENT) USED
Once I had the body all welded and repaired, I had to seal all joints and protect the body before painting.
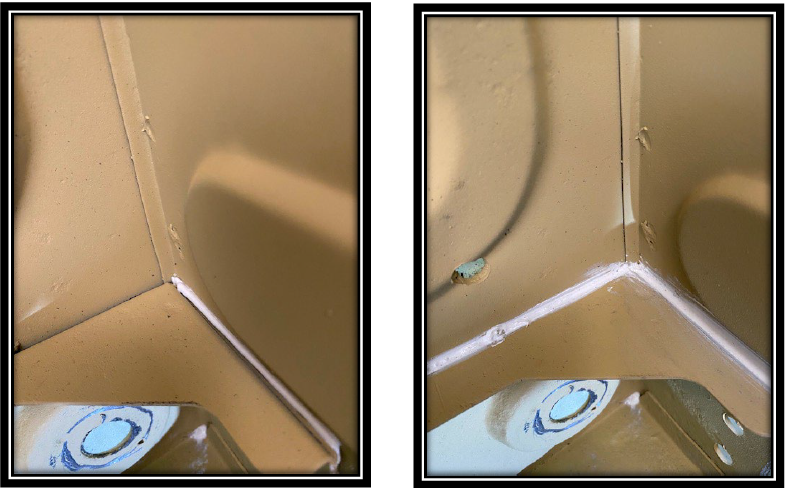
F26:NOTE: SEALER APLICATION F27:NOTE: SEALER APLICATION FINISHING
It takes a while to get the hang of it, it’s a bit messy and leaving it pretty is nice but not the objective. As long as the seams are correctly sealed that’s fine and there is also more protection to come. As we all know the cars were not especially well sealed well when leaving CANLEY.
The sealant I used was the following, a fairly standard sealer used widely in the industry, and relatively cheap.
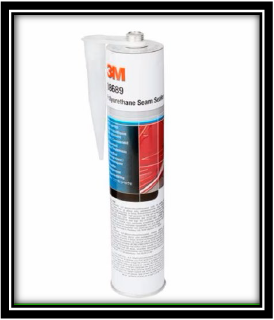
F28:NOTE: POLYURETHANE SEALER USED
Additionally, to the seam sealer I decided to spray the underbody with some extra protection. The protection I chose was GRAVITEX PLUS by U-POL, we have been using this on refurbished industrial vehicles for some time and it lasts very well, easy to apply but it does make a lot of mess if you are not careful, please adhere to all safety instructions when using any of the stated material, gloves, mask and goggles at all time. Make sure you prepare well the area, lots of dust sheets and make sure you mask up the rest of the body well before you start to spray.
The gun that screws into the top of the bottle has an adjustable nozzle, try a few shots on to a piece of cardboard to get the correct texture that you want before applying it to the body, you only get one shot once its on, more texture more material, if a remember rightly I used 8 bottles more bottles than I expected.
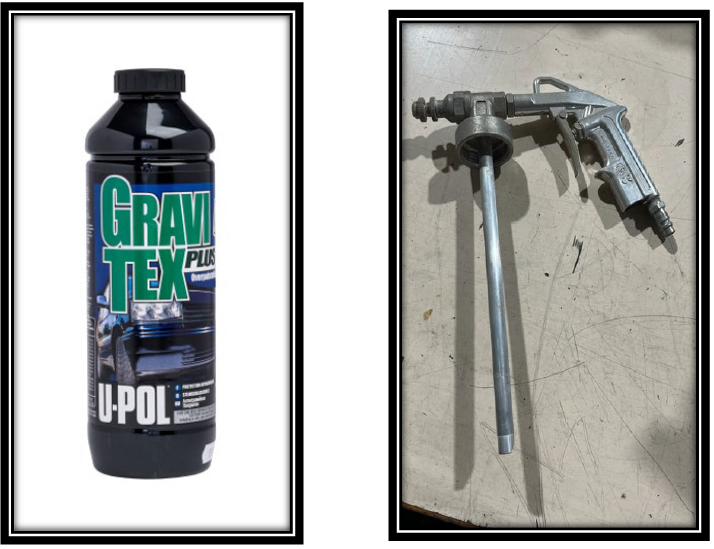
F29:NOTE: PROTECTIVE SEALER USED F30:NOTE: SPRAY GUN WITH ADJUSTABLE NOZZLE
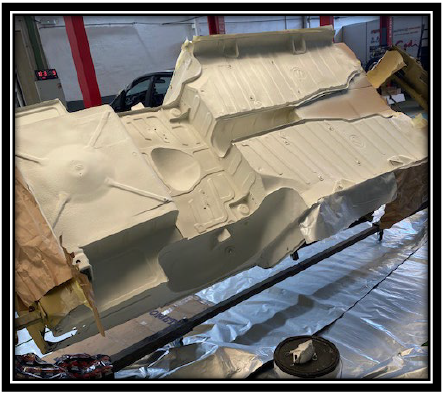
F31:NOTE: GRAVITEX ON ALL NON VISIBLE BODY PARTS
THE PAINT
What colour?, this was a big dilemma, I initially thought of painting it in its original colour JAVA GREEN (F1) Although the JAVA GREEN was starting to grow on me, I was overruled by the family. So an alternative colour had to be found. Every time I looked up TR6 on the web they where either red or green, the odd yellow one and a few other colours scattered about. On one of my searches I came across (F32) I must admit it looks very good, certain colours do favour certain cars.
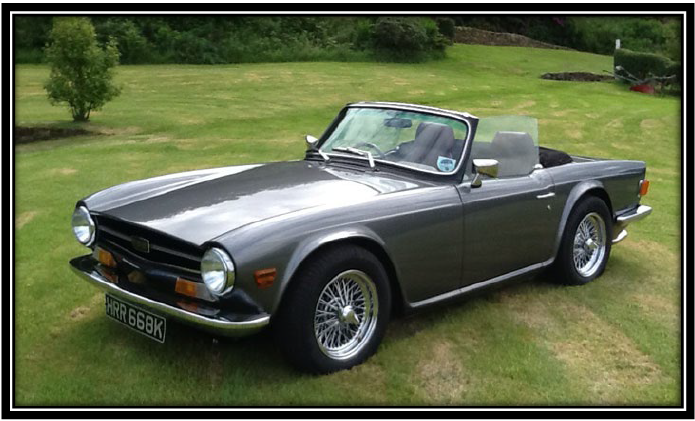
F32:NOTE: 1972 GUN METAL GREY TR6
Now, what do we do? I spoke to Derek and Alvaro, they both agreed on an original colour. When I spoke to Derek and asked him, according to his register which colours are the least common or there are fewer of? Topaz, Magenta & Mallard Blue, was the reply. My wife Isa decided unanimously for the Mallard Blue.
I also spoke to Alvaro and he told me that according to the Spanish register there were only another 2 TR6,s of that colour in Spain. So Mallard Blue it was to be.
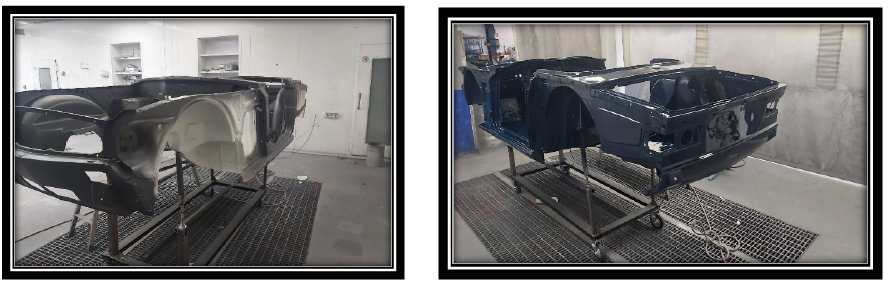
F33:NOTE: BASE COAT GOING ON F34:NOTE: COLOUR COAT GOING ON
As the sheet metal on the triumph is fairly thin and there are few swages in certain places, I decided to stiffen up the panels to improve the N.V.H (Noise Vibration & Harshness), this comes from my FORD days. I decided to use 3M Sound deadening Pads (3M ID 7000043146), they are easy to apply, they come with sticky back plastic, scissor cut to suit and finish the form with a heat gun and a roller.
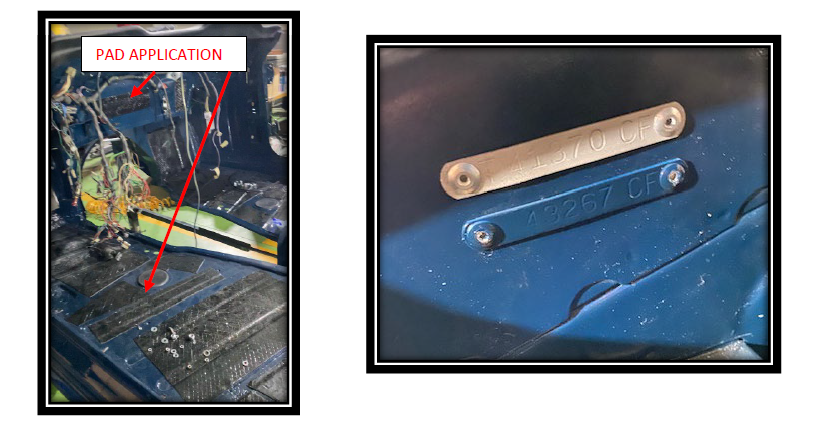
F35:NOTE: LEAVE A SPACE BETWEEN EACH PAD F36:NOTE: THE TRIM NUMBER SHOULD REMAIN UNPAINTED
THE ENGINE & TRANSMISSION
The engine and transmission were probably the best parts of the car, the engine ran well, clutch engaged well, no noise from the gearbox or differential. The car had already been driven and tested by Nick in England. I also drove it round the Industrial Park on the Sunday (no body around) after it arrived, to try it for myself. I did however do a compression test on each cylinder to make sure they were all equal. Once the body was off and being prepared and treated, I took the engine and gearbox off the chassis. Separated the engine from the gearbox and gave them both a good clean with de-greaser and a pressure washer, making sure to cover
all the holes to ensure that water did not go into the engine or G/box. I stripped off all parts that need blasting and painting, got a complete gasket set from RIMMERS to change all the gaskets on the engine.
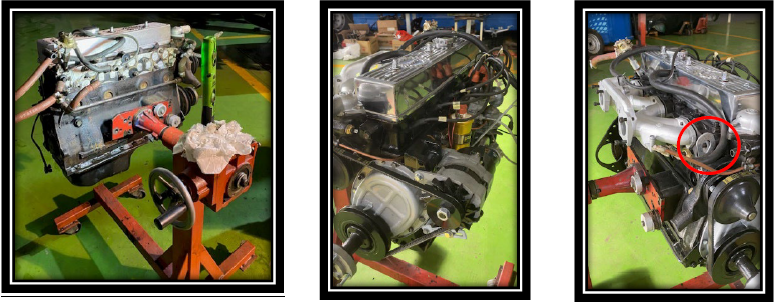
F37:NOTE: ENGINE BEFORE F38:NOTE: ENGINE AFTER F39:NOTE: ENGINE LIFTING EYE
(The lifting eye I made specially to make life easier, as far as I know this engine only comes with one lifting eye at the back of the engine)
Although the oil pressure was good even when the engine was hot, I took the sump off, checked the big end cap and crankshaft bearings for wear and also inspected the oil pump. I also took the timing chain cover off to inspect the chain for wear, and of course change the front crankshaft seal, did the same for the rear crank seal. For this you need to take the clutch pressure plate and friction plate off and the fly wheel. The clutch was new, due to the fact there was no wear on the friction plate, very little clutch dust in the gearbox housing and in the pressure plate. The clutch release bearing looked new with no wear, this denoted that the
clutch had been changed recently, this would account for the miss match of nuts and bolts around the bell housing. What I could not understand is why the clutch fork pin had not been changed (a common fault) once I undid the safety wire (looked very new) on the pin and unscrewed it, only half came out.
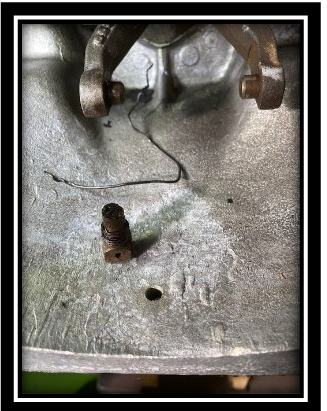
F40:NOTE: CLUTCH FORK PIN
I now know why the clutch fork pin was not changed, it is virtually impossible to take out the broken piece from the shaft, the broken piece was not allowing the clutch fork to slide along the shaft, so that the fork could be removed off the shaft, to enable the shaft to slide out of the box, solution, cut the shaft in two halves to be able to get the clutch fork of the remaining shaft. So, new shaft ordered, and new reinforced pin put in. I recommend that anyone changing a clutch on a TR6 or any other TR with this type of clutch layout, to always change the pin for the new reinforced type.
As you will have seen on frame (37 & 38) the rocker cover (aluminium) has been polished, thanks to CUSTOCROM also for the front bumper (re chromed) and other polished parts, more
on that later.
THE WIRING
When I got the car there was a pack of fuses in the glove box, bad sign. Nick did tell me that there was a problem with the lights on the car. I found out what the problem was when I stripped the car and took the wiring loom out, on the rear wiring loom serving the rear lights there was a wire that had been somehow caught between the rear valance and the spare wheel well, over the years the constant rubbing and chaffing of the wire caused the wire to go to earth and blow the fuse. This would have been very difficult to find under normal circumstances. Once I had the loom out on the bench I could inspect and repair any wires and connectors. Taking care to label each connection and changing grommets for new ones.
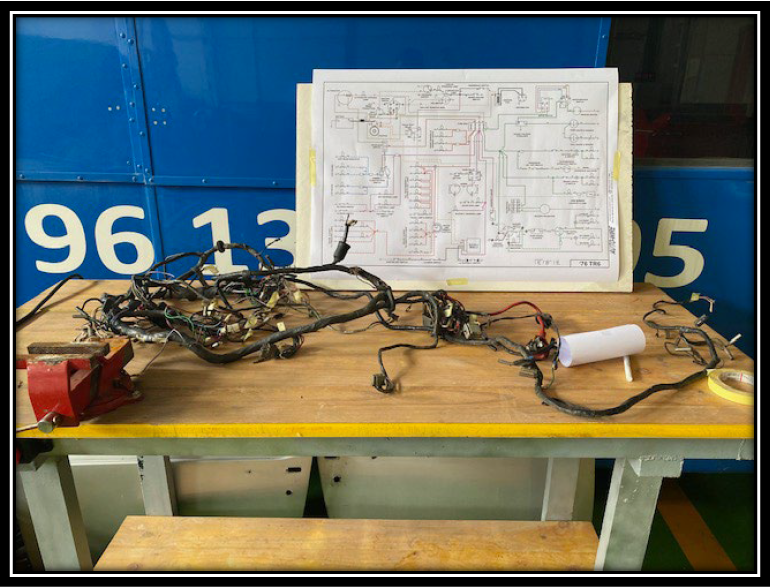
F41:NOTE: WIRING LOOM AND WIRING DIAGRAM
Downloaded the wiring diagram from the club web site, worth spending a couple of euros and going down to your local printers and getting it printed in an A1 format, your eyes will appreciate it. Now, on Hine sight and bearing in mind the amount of false connections (difficult to clean the connectors properly without replacing them) I had once the loom went back in, I would have brought a new loom, the additional cost would have made up for the time spent fixing the connections afterwards. Or the alternative was to change every single connector for a new one.
THE BUILD
Now the fun starts, you are faced with lots of parts in lots of boxes. Now where to start, I decided to build up the chassis, a logical and obvious decision as then I would have a base to put the body on. Also it would give the paint on the body time to get hard, I would not recommend working on a recently painted body, give it time to settle. Right, the chassis frame is now nicely painted, all your suspension components are bushed and ready to be assembled. This for me was one of the most enjoyable parts of the build because in a little space of time you are now seeing a lot of progress.
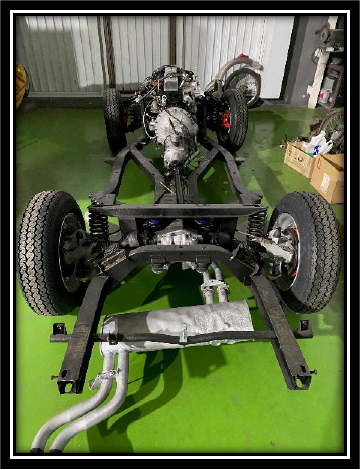
F42:NOTE: ROLLING CHASSIS AWAITING BODY
When assembling all chassis components I would highly recommend the hardware kits that you can get from either one of the suppliers, RIMMERS, MOSS, JAMES PADDOCK, they come in kits for each section, front suspension, rear suspension, wings front and rear etc etc. I would also recommend a couple of garage packs that come with an assortment of different size nuts & bolts, washers, spring washers etc. Also another must in my opinion is, on every piece of hardware that you assemble, always assemble them with “Copper Grease or Spray” or a similar lubricant.
You or someone else in the future will be grateful of this little detail, especially here.
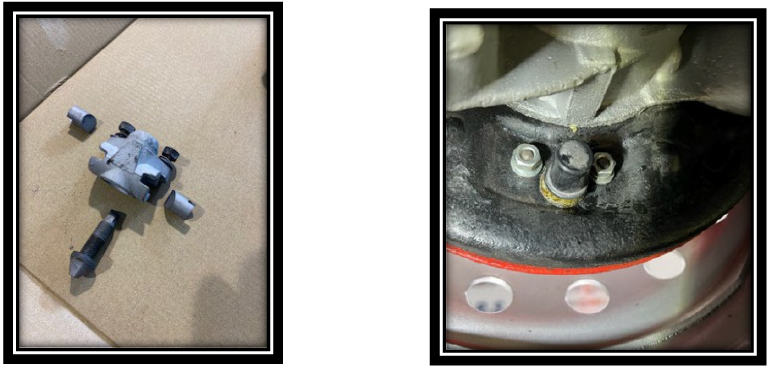
F43:NOTE: CLEANED ADJUSTER READY FOR GREASE F44:NOTE: PROTECTIVE COVER
As you know the rear brake adjusters are an alloy case & steel screw (bad combination) lots of copper grease and protect with cover.
Before I put the body on I had to find a visible place to stamp the VIN number, I chose the left hand side top chassis rail near the suspension turret. It can be seen from the engine compartment once the bonnet is open, also the chassis is reasonably rigid in that area to take the hammering of the punches. This number is required to be stamped on the chassis for Spanish Legislation Purposes.
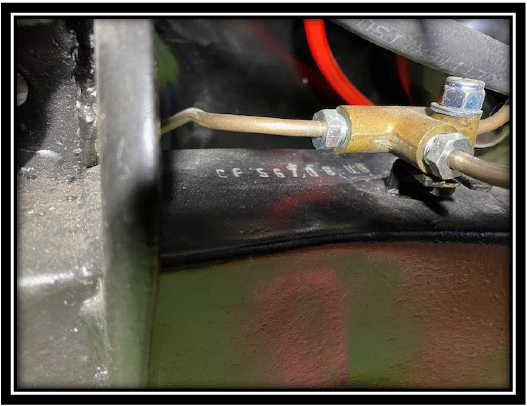
F45:NOTE: CHASSIS NUMBER POSITION
BODY ON
Using the body trolley I made up (F8) wheeled it over to the two post lift, hoisted it of the trolley and rolled the chassis under the body. Before I lowered the body onto the chassis a placed the rubber strips along all the parts of the chassis that the body potentially would have any contact with. The rubber strips supplied seemed rather thin, I decided to put 3mm think rubbers to ensure better contact and more of an absorbing effect. As the door gaps were reasonably good and when I took the body off it all seemed to be well aligned, no signs of accident damage, it was all very sound. As I let the body down on the chassis and checked all contact points and added spacer washers where necessary. I tightened down, not completely, the 6 center positions, front and rear chassis outer brackets and the two left and right fixings on top of the rear axle support bracket. Place all body fixing hardware to the rest of the fixings but did not tighten completely until the doors went on. Once I was happy with the door gaps I could now tighten the rest of the body to the chassis. (There are many videos and tutorials on the web that can help with this part of the job) Talking about hardware, a very important exercise which aids the assembly no end, is to put a tap (depending on the thread), into a battery powered drill and clean all of the threaded holes you have either in the chassis or the body, to remove any paint. Once you have cleaned all of the threads apply or spray copper grease into the apertures to ensure easy assembly and disassembly in the future. You will need some help when guiding the body down, especially around the engine area. Now the rest of the build could continue. For the transmission cover, similar smaller rubber strips where supplied, as the trans cover is not the most uniform part, I decided to use butyl sealer, its easy to apply and ensures a good
seal.
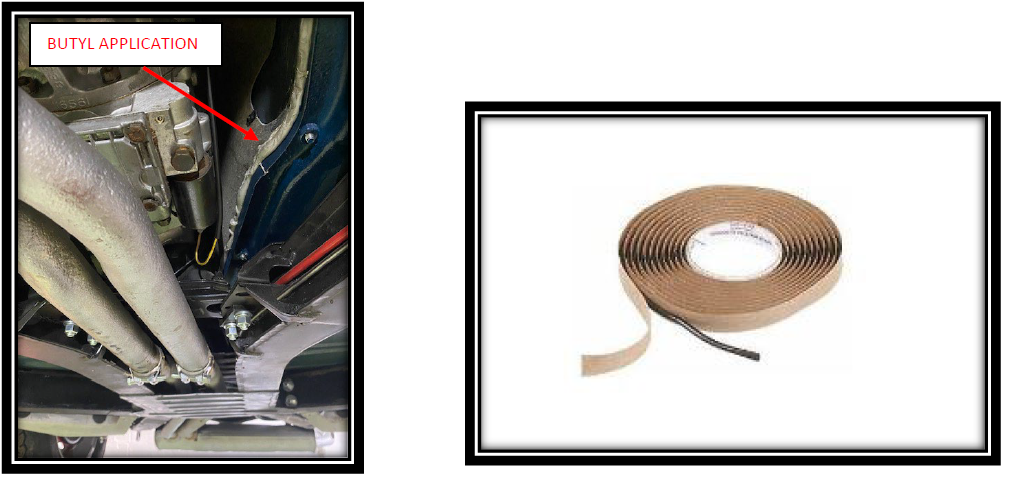
F46:NOTE: TRANSMISSION COVER TO BODY F47:NOTE: BUTYL SEALER REF: 30920
Another essential kit was the body grommet set, available from most suppliers, for the price of the kit its well worth it. I have seen many restorations and these little items make all the difference. I now proceeded with putting in the dash panel, clocks, instruments, heater and instrument panel. Make sure you try the heater fan motor before you put it back in, they tend to get noisy overtime, a bit of spray grease on the bearings will do the trick. Important to get the heater radiator leak tested before you assemble, once the heater radiator is in the car, its not a 5 min
job to change. Talking about 5min jobs, I changed the complete wiper mechanism, putting new spindles in and greasing them well. I would like to meet the operator who fitted the spindles at Canley and shake his hand, what an awful job. I now have a lot of experience because I had them in and out a few times. First rule, make sure you know which way the wiper cable goes, under or over, I can’t believe that after taking hundreds of photographs of the restoration, I did not take any of the wiper mechanism. Make sure you do, if you get the position wrong the wipers will not go in the right direction. Another thing I found is that on the original wiper boxes the wheel is splined to the shaft, whereas on the current ones available, the wheel is pressed onto the shaft, a considerable saving in the manufacturing process, but a considerable reduction in the turning force that can be exerted on the wheel. I found this out once I had correctly fitted the wiper cable correctly, the wiper spindles where going in the right direction, (when you are testing never put the
wipers on until you are sure what position they change direction at) I put one wiper on to try, at that moment I thought it was going to go past the stop position and damage the paint just below the screen, so I held it and low and behold, with this little force the spindle had stopped turning but the motor was still working, So out came the wiper boxes AGAIN !!! This time a put a little spot weld on each shaft & wheel to ensure this would not happen in the future.
TRIMMING
Another very satisfying part of the project, as you can now see light at the end of the tunnel and each day that goes by you can see the progress. Not much more to tell here, be patient, don’t rush things, one thing I will say is the following.
During this part of the build you are in and out of the car many many times, I put my door seals in early to avoid me getting hurt and being uncomfortable when sitting in the door aperture doing stuff. Within no time the new door seals looked tatty due to the constant rubbing and chafing of me getting in and out. Keep your old door seals and use them. Wiring tangs, I found the best way to cover these was with shrink wrap, get the right diameter, cut a small piece of to size, shrink with heat gun. Leaves a nicely protected tang and looks good.
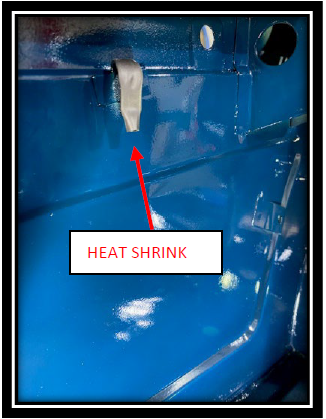
F48:NOTE: SHRINK WRAP WIRING TANG
When fitting the door boards, I felt that the original dark coloured Philips screw did not look quite right. I found these chrome capped screws in Amazon, just to give it another look. I also used 4 on the rear quarter panels behind the seats, the closest ones to the “B” Pillar.
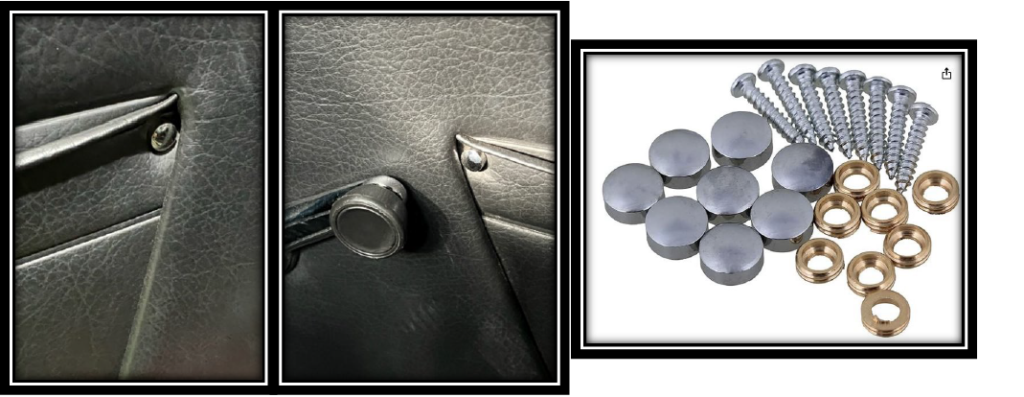
F49:NOTE: DOOR BOARD CAPS F50:NOTE: SCREW AND CAP SET
My TR6 came with the “B” Post Gusset untrimmed, the outer face of the gusset was body colour. I had some trim material left over so I covered the gusset panel. I think it looks a lot better with some trim on it.
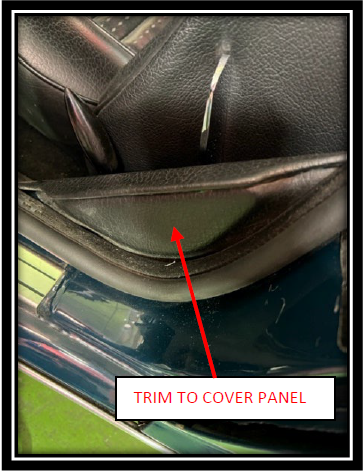
F51:NOTE: EXTERIOR PART OF “B” PILLAR GUSSET COVERED
Another change I thought I would do, was to break up the dark dash pad, instead of having the windscreen air vents and the ash tray mat black I would have them chromed (CUSTOCROM)
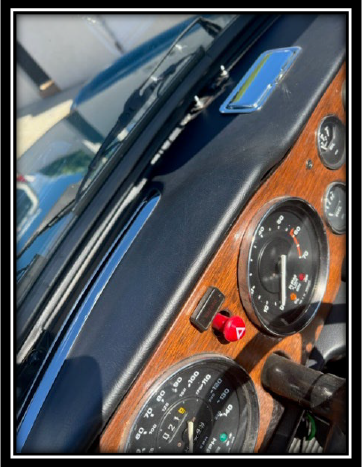
F52:NOTE: CHROME VENTS & ASHTRAY
THE ALARM SYSTEM
One thing I did add was central locking and an alarm system, we all know that the locks on a TRIUMPH are not the best in the world and can be opened with a screwdriver. I also wanted, after so much work and effort to protect the car.
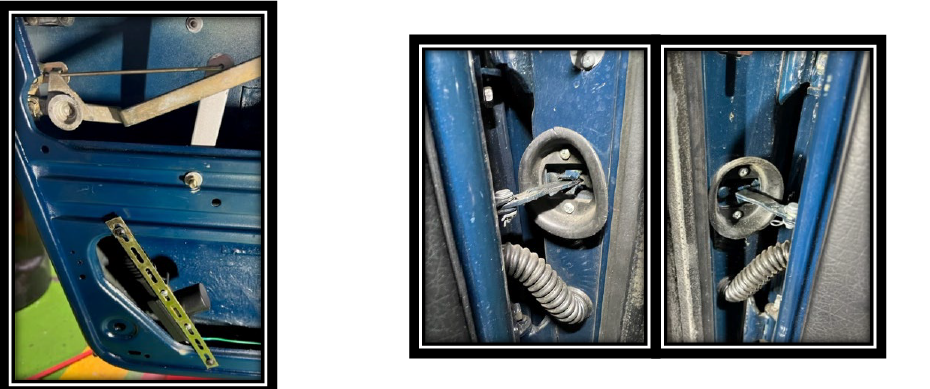
F53:NOTE: SERVO & ADHOC BRACKETS F54:NOTE: GROMMET FOR SERVO WIRING ALFA 105 SPIDER REF: RB086
The 12v servos are readily available on AMAZON and other portals, as far as the alarm system goes, there are many to choose from. I just needed inputs for door, bonnet and boot opening detection. It took me a while to find the door grommets, but the Alfa Romeo ones fitted a treat.
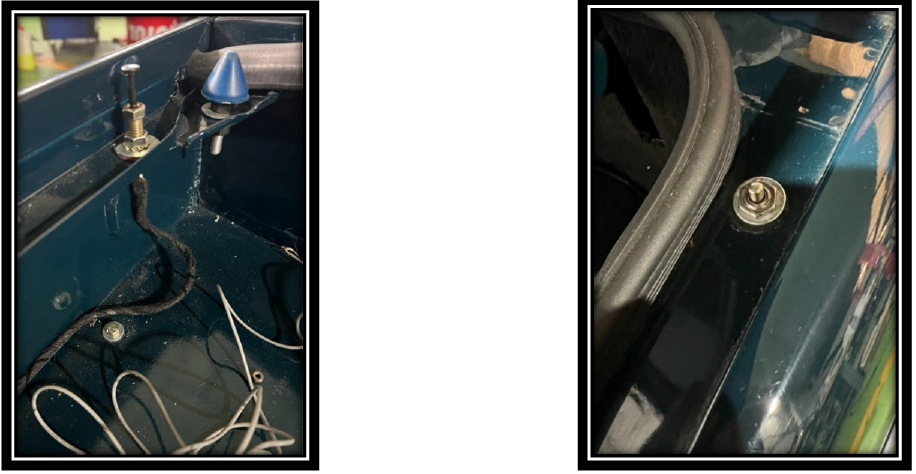
F55:NOTE: BONNET ALARM SWITCH F56:NOTE: BOOT ALARM SWITCH
Other improvements include captive nuts, the first captive nuts I used were on the boot latch to body and boot lid. There was one nut missing on the boot and two on the body. The tool comes in very handy for other parts of the body with limited access behind the panel, like the headlamps.
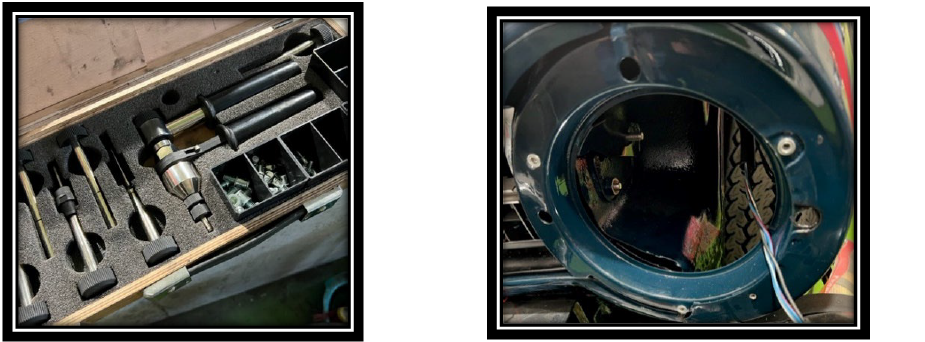
F57:NOTE: TOOLS FOR CAPTIVE NUTS F58:NOTE: MORE SECURE FIXING WITH THREADED BOLTS
WHEELS & WHEEL NUTS
Some of the plastic collets on the wheel nuts were missing, with age they tend to go brittle and snap, so no problem, many suppliers have them in stock so I purchased the collets I needed. Low and behold, when I went to fit the collets, they would not fit properly on some of the wheel nuts. I found that I had a miss match of wheel nuts at first sight they seemed ok, but there was a difference as you can see from the photos below. So a purchased a complete set of wheel nuts NOS (thanks T.D. FITCHETT).
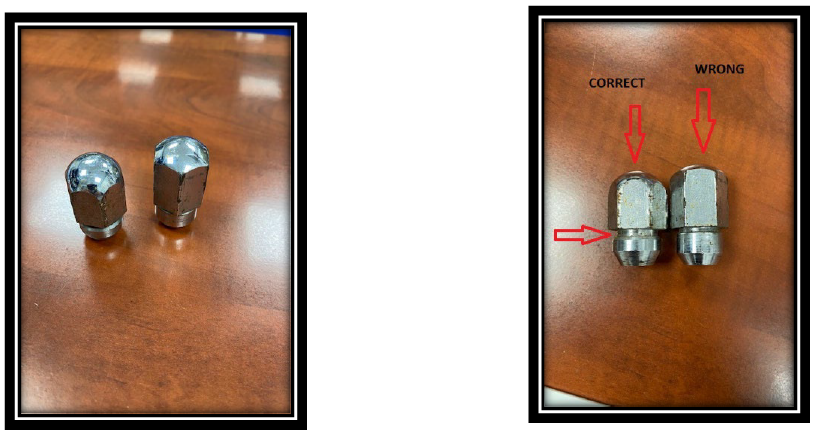
F59:NOTE: SAME HEXAGONAL SIZE & THREAD, DIFFERENT HEIGHT F60:NOTE: COLLET GROOVE DIFFERENT
The paint on the steel wheels was pretty bad, so I decided to have them bead blasted and primed. I was having difficulty finding the correct colour silver. The spare wheel was in better condition and looked original. I cleaned it with some detergent and with a Spectrophotometer, from my friendly painter, we came up with a very close match (F61) it can also be seen on (F62)
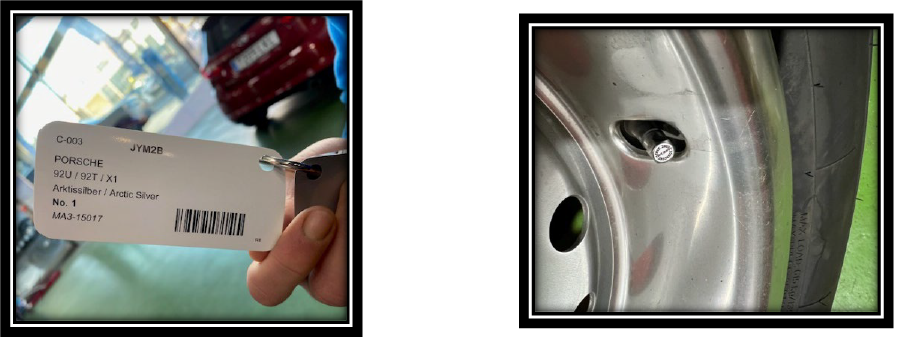
F61:NOTE: COLOUR TYPE USED ON WHEELS F62:NOTE: COLOUR ON WHEEL AND DUST CAP
SEALER
Most of the corrosion problems on TR6’s is water laying in between wings and body panels. There are many opinions, methods and materials that people use to seal in between the panels. The most effective material is good old plasticine, its easy to mold, does not go hard and it’s easy to replace and waterproof. It will need replacing after a time taking into account washing and polishing. I used a black colour plasticine and it looks pretty good. Special thanks to Derek and Craig at TRBitz.
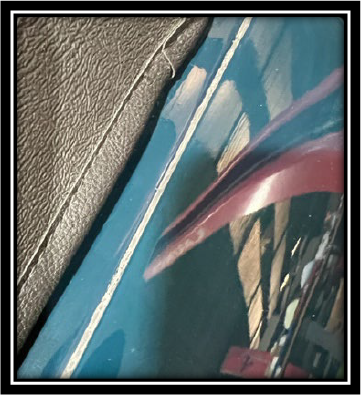
F63:NOTE: PLASTICINE BETWEEN BODY PANELS
HARD TOP
I came up with alternative hardtop fixings, this allows you to fit the hardtop without the need of removing the softop frame. You can put your hardtop on in less that 5 min with these fixings.
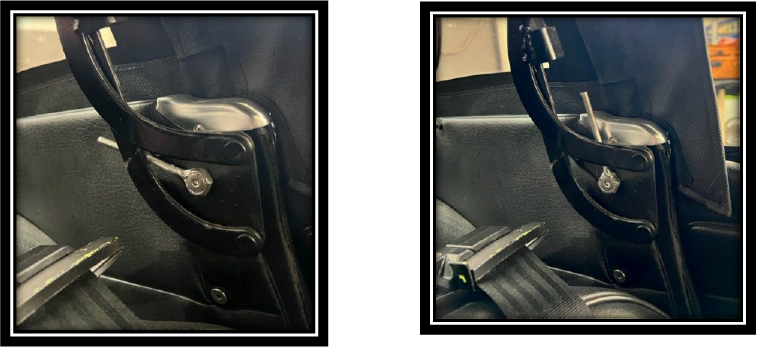
F64:NOTE: CENTER HARTOP FIXING (REST POSITION) F65:NOTE: CENTER HARTOP FIXING (FIX POSITION)
(I ALSO CHANGED THE NORMAL COUNTERSUNK SCREWS FOR COUNTERSUNK SCREWS WITH ALLEN KEY HEADS)
FUEL TANK
During the build, as for most steel parts I got them back to the bear metal, primed and painted them. First fill of the tank, with a few liters, a leak appeared on one of the seams, possibly due to the cleaning, thin metal and old age. Took the tank to one of our suppliers, same supplier that leaked tested the heater radiator and main radiator RADIADORES LEVANTINOS, they repaired the tank by brazing the seam, the manager there told me that he could guaranty the repair but could not guaranty the rest of the tank, never a truer word spoken. I cleaned the tank so many times, but still in the inside of the tank, there would be a type of corrosion residue that never seemed to stop coming out. Result, new tank.
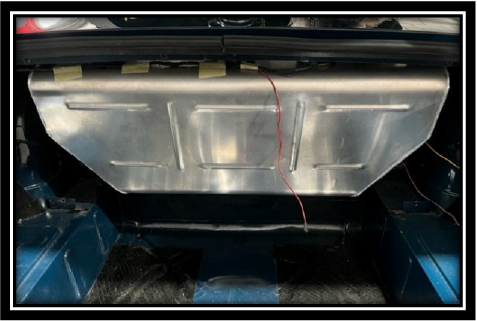
F66:NOTE: ALUMINIUM TANK
I decided for an aluminium tank, no more crap and a tank for life. When I restore my next car the first thing I will do is throw the old tank away and buy a new one, saves lots of time and money. In line fuel filters, in the case of picking some sediment up or foreign bodies in the fuel, I decided to go for this type of in-line filter, it can be opened and cleaned, its made of glass so it will not go opaque with the passing of time as many plastic filters do, and it looks good.
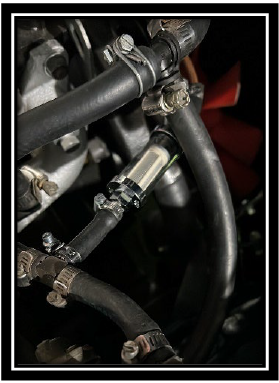
F67:NOTE: IN-LINE FILTER SYTEC PRO805
Whilst we are on things that look good, I have a thing about jubilee clips, they should all be the same way around, “Engine Bay Beautification” days at FORD again I am afraid.
SEATS (ALTERNATIVES)
Normally the alternative seat for the TR6 is the MK I or MK II Mazda MX5 seat. I had trouble locating leather seats, all the seats I could find reasonably priced where all cloth. What I did find were these from FK Automotive.
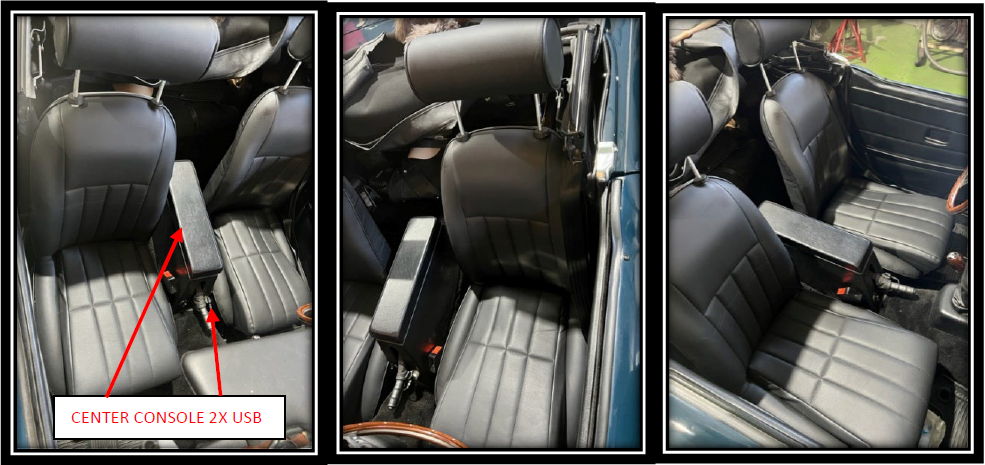
F67:NOTE: ALTERNATIVE SEATS AND CENTRE CONSOLE WITH TWIN USB CONNECTIONS
Me being rather on the large side, these seats are better suited for a nimbler man, but they are comfortable. Having my stature and having inertia reel seat belts (thanks T.D. FITCHETT NOS, still in original box with grease proof paper), I purchased these seat belt guides, the function is twofold, keeps the belt easily accessible and does not pull down on your shoulder, you will appreciate this on long journeys.
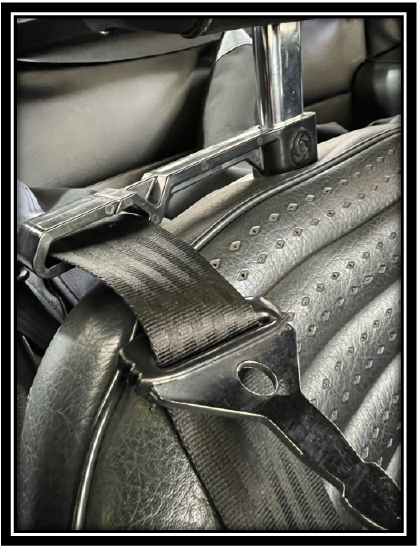
F67:NOTE: SEAT BELT GUIDE
SPECIFICATION & EXTRAS
FULL BODY OFF REBUILD, CHASSIS & BODY SAND BLASTED,ALL METAL PARTS SAND BLASTED,COATED AND PAINTED, CHASSIS INTERIOR TREATED WITH WAXOIL,FULL BODY UNDERSIDE ANTICHIP COATING, 3m INSULATION PADS ON ALL AVAILABLE UN SEEN PAINTED PANELS,COMPLETE POLYURETHANE BUSH REPLACEMENT,NEW ENGINE, GERABOX & DIFERENTIAL MOUNTS, NEW FRT & REAR CRAKSHAFT SEALS, OIL CHANGES ON ENGINE, GEARBOX & DIFFERENTIAL, NEW FRONT SHOCK ABSORBERS (MAINTAINS ORIGINAL REAR SHOCKS), NEW ALUMINUIM FUEL TANK AND SENDER UNIT, RECONDITIONED RADIATOR AND COMPLETE HOSE REPLACEMENT, NEW WIPER MECHANISUMS, GREEN PAD BRAKES AND NEW SHOES FITTED, REVOTEC ELECTRICAL FAN WITH TEMPERATURE CONTROL ,UNDER BONNET INSULATION, TWIN WEBER CONVERSION, POLISHED ALUMINIUM ROCKER COVER WITH TRIUMPH EMBLEM, NEW DISTRIBUTOR WITH ELECTRONIC IGNITION CONTROL (WITH VACUM ADVANCE), TOP DASH PAD AND BOTH LH/RH CRASH PADS REPLACED, NEW INTERIOR VYNIL REPLACED INC FOOTWELL PADS, NEW DOOR & GLASS RUBBERS, TINTED DOOR GLASSES,
ELECTRIC AERIAL, ALL NEW WEATHER STRIPS, NEW HEATER CONTROL PLINTH, HEATER RADIATOR PRESSURE TESTED AND CLEANED, FULL CARPET SET INC. FULLY LINNED BOOT, MOTO-LITA STEERING WHEEL, CENTER CONSOLE (ARMREST) INC. 2 X USB CONECTORS, BOTH DOOR GLASSES TINTED, NEW SOFTOP AND COVER, ALTERNATIVE FK AUTOMOTIVE SEATS, ORIGINAL TONNEAU COVER AVAILABLE (WILL NEED CLIPS RESETTING), REFURBISHED HARDTOP, CHROME BOOT RACK WITH LEATHER BELTS, 5 NEW 185 X 15 TYRES, NEW 12V 75AMP BATTERY, ALARM SYSTEM INC. SHOCK SENSOR, BOOT, BONNET OPENING & CENTRAL LOCKING, PLASTIC INNER WHEEL ARCH COVERS FRONT & REAR, ADZONE DASH CAM FRONT AND REAR, SM OUTDOOR COVER WITH TRIUMPH EMBLEM.
This following list of acknowledgements are in no particular order, (except for the first one) really a sequence of the start to finish of the project. I have to give my most sincere gratitude to everyone involved.
Isabel MY WIFE (time and patience)
Nick Cant (First inspection, storage & UK registration, help when the going got tough)
Derek Graham UK TR Register (A wealth of knowledge, tips, pointing me in the right direction, a major player in the project)
Graham Andrews UK TR Register (DVLA vehicle registration)
Pancho Marco (LOGISMAR Vehicle Importation)
Felix Leon (AUTOLIX, space in workshop, assistance, painting and above all motivation)
Alvaro Toledo & the rest of the members of the Spain TR Register (great club to belong to)
Jose Antonio Hueso (DECAMER DECAPADOS Y GRANALLADOS S.L. Shot blasting)
Pepe & Antonia CUSTOCROM S.L. (Chroming & Polishing)
Antonio Castillo (TACIMU, welding & and adhoc parts)
Gordon Lowe (RIMMERS, spare parts & advise)
Sergio Supronenco ( hold this, hold that, and a great help all round)
Vicente Vazquez (Proficient, assessment and valuation report)
JAMES PADDOCK, T.D. FITCHETT, MOSS EUROPE
Allan Smith (WEBCON UK LTD setting up Webers carbs)
Craig TR BITZ (advise on body sealer)
Juan Francisco García-Melgares Abellán (Technical Data Sheet & Vehicle Homologation)
Well I think that’s most of it, especially the important things, my memory is not what it used to be, so sorry if I have left anyone out. I think I have covered most of the different things that I did to the car, this was not meant to be a lesson in restoration, I just wanted to share my experiences, the rest was a fairly straight forward re-build. I am sure you all have different ways of doing things.
“Happy Classic-ing”